Wednesday, January 26, 2011

Daisy a Day


MATERIALS
• 40cm (16in) square of white cotton fabric
• No 7 crewel needle
• DMC Stranded Embroidery Cotton: one skein each of topaz (725), light topaz (726), very light topaz (727), very light golden olive (834), dark forest green (987), medium forest green (988), light khaki green (3013), very light golden yellow (3078), light yellow green (3348), pine green (3364), bridal white (3865), blanc (white)
• 15cm (6in) embroidery hoop
• Water-erasable marking pen

DESIGN SIZE
20cm (8in) square

STITCHES USED
French knot, stem stitch

PREPARATION
Transfer the design from the pattern sheet onto the fabric with the water-erasable marking pen, using your favourite light source. This could be done by taping the design to a sunlit window, then taping the fabric over the top of the design, making sure that it is centred.
Outside the area of the design square, pick one side of the fabric and draw arrows towards the embroidery, all in the same direction. This will help with your shading when embroidering the design.

EMBROIDERY
All the embroidery is worked using two strands of embroidery cotton threaded in the No 7 crewel needle. Refer to the pattern sheet to establish the colour combination for the daisies. Using dark forest green (987), stem-stitch the vein in the centre of the leaves. The remaining embroidery is stitched in closely-placed French knots. Place your work in the embroidery hoop pulling it taut. Fill the centre of the leaves in dark forest green (987) and then finish stitching the outer edges of the leaves in medium forest green (988) using the pattern as a placement guide.
The yellow daisies are stitched next. Begin a petal on the same side as the arrows that you placed on the fabric.
With two strands of topaz (725) work one row of French knots. The second row of French knots is embroidered using one strand of topaz (725) and one strand of light topaz (726) threaded together in the needle. For the third row use two strands of light topaz (726). Then the next row is stitched with one strand of light topaz (726) and one strand of very light topaz (727), also threaded in the needle together. Finish the petal with two strands of very light topaz (727). Work the remaining leaves in the same manner, starting the darkest shading on the same side as the previous petal. If you find that you cannot fit all the colours into the petal, omit the mixed threads, remembering to have at least three different colours at the base of each petal to define them.

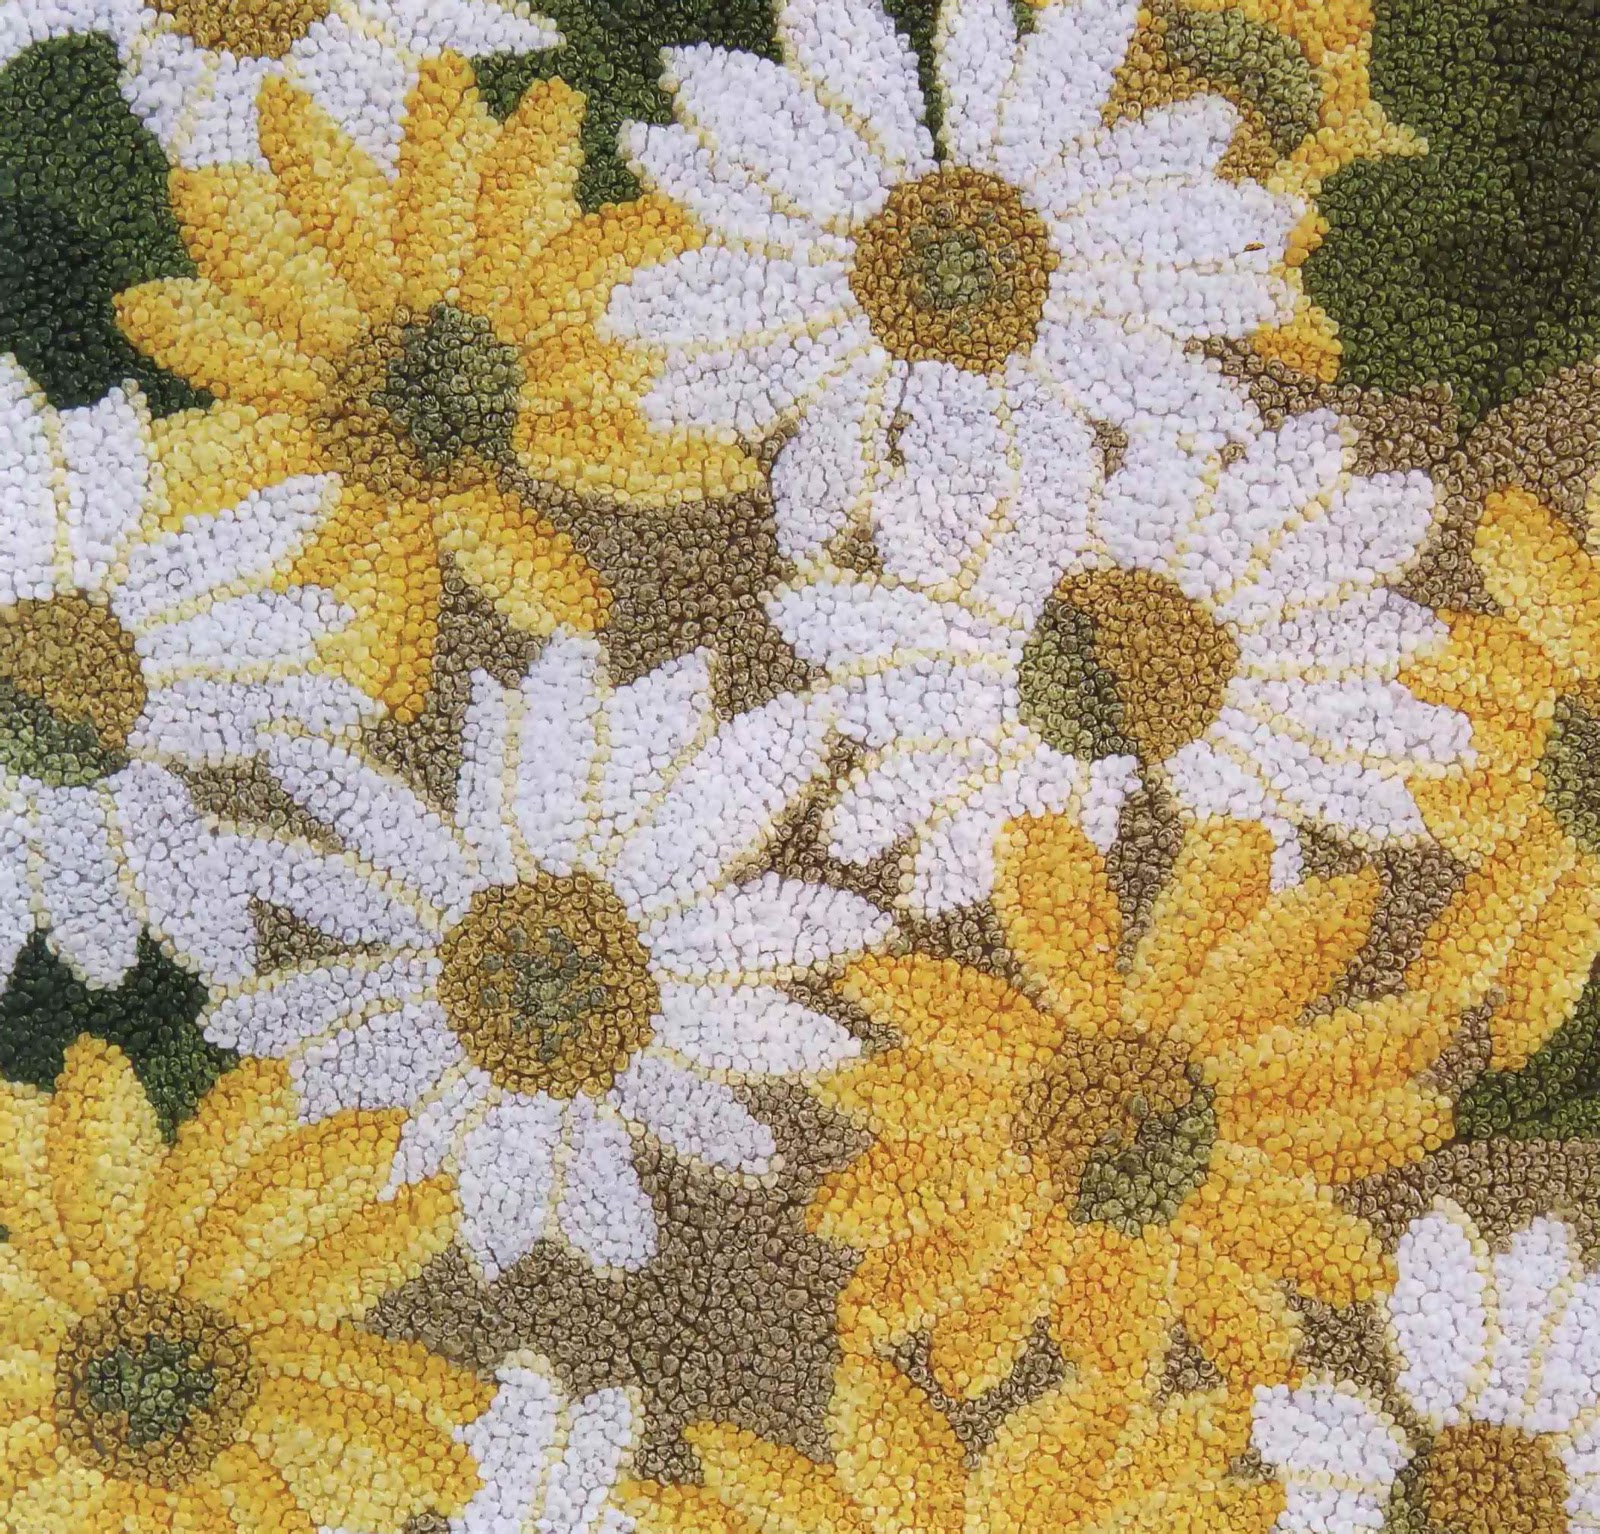
The white flowers are embroidered a little differently. Using the arrows as a guide again, start on one side of the petal using two strands of very light golden yellow (3078), stitching one row of French knots. Work the second row using two strands of bridal white (3865). Embroider the remainder of the petal in blanc (white). Finish each petal in the same manner. Using the pattern sheet as a guide, fill in the centre of the daisies beginning with very light golden olive (834) as the deepest shade, working the next section in pine green (3364) and then finishing off with light yellow green (3348). Fill in the background area with light khaki green (3013), still using French knots.

FINISHING
Your embroidered piece is now ready to be framed or it can also be made into a cushion.

Heart of Blossoms Blanket

Blossoms and forget-me-nots entwined on a heart full of love - this beautiful, soft wool blanket, would make a lovely gift to be treasured.

MATERIALS
• 80cm x 100cm (3l 1/2in x 39in) cream wool blanketing
• 105cm x 125cm (41in x 49in) warm white fabric for lining
• Watercolours by Caron: one skein of rose quartz (031)
• Appletons 2 ply crewel wool: One skein each of very light cornflower (461), very light autumn yellow (471), very light heraldic gold (841)
• Gumnut Blossoms Wool Yarn: very very light raspberry (050), light raspberry (052), medium sage green (625)
• Gumnut 'Jewels' Silk Thread: one skein of amethyst light
• Gumnut 'Buds" Silk Thread: one skein of light sage green (543) one skein of 564
• Madeira Silk Thread: one packet each of sage green (1510), golden brown (2210)
• YLI Silk Floss: one packet of rose pink (190)
• 3m (3 1/4yd) No 000 piping cord
• 3m x 15mm (3 1/4yd x 1/2in) pink satin bias binding
• No 24 and No 22 chenille needle
• No 7 crewel needle
• No 1 milliner's (straw) needle
• Tracing paper
• Blue water-soluble marking pen

DESIGN SIZE
22cm x 24.5cm (8 1/2in x 9 1/2in)

STITCHES USED
Bullion knot, colonial knot, couching, fly stitch, French knot, granito, lazy daisy stitch, pistil stitch, stem stitch, straight stitch

PREPARATION
Trace the outline of the heart from the pattern sheet onto the tracing paper, marking in the placements of the flowers with a cross. Pin the traced heart onto the centre of the blanket and tack around the outline, using a coloured thread. Tear the tracing paper away, being careful not to pull the tacking stitches loose.

EMBROIDERY
Heart: Using one strand of rose quartz (031) in the No 24 chenille needle, stem-stitch the outline of the heart.
Blossoms: Each petal is a granito stitch of six to seven stitches, using two strands of very very light raspberry (050) threaded in the No 22 chenille needle. Add a fly stitch and then a straight stitch at the tip of each petal using one strand of light raspberry (052) in the same needle. Stitch three straight stitches from the centre to the tip of each petal with one strand of rose pink (190) in the No 7 crewel needle, to give highlights to each petal. To fill the centre of the blossom, stitch two-wrap French knots in a combination of one strand of very light autumn yellow (471) or very light heraldic gold (841) with one strand of golden brown (2210) using the No 7 crewel needle.
Stems: The stems are stitched with one strand of medium sage green (625) couched down with the same thread in the No 22 chenille needle. They are then whipped with one strand of sage green (1510) using the No 7 crewel needle.
Buds: The main part of the bud is made up of a granito of five stitches using one strand of very very light raspberry (050), and one strand of light raspberry (052) both threaded in the No 22 chenille needle. The sepals are stitched with three straight stitches, stitched over the bud, with one strand of medium sage green (625) blended with one strand of light sage green (543). Add two straight stitches at the base of the bud with one strand of light sage green (543) to form the calyx.

Leaves: Using one strand of medium sage green (625) threaded in the No 22 chenille needle and starting at the tip of the leaf, stitch five to seven fly stitches. Then, using the same needle threaded with one strand of 564, stitch seven to nine straight stitches between the fly stitches. To anchor the leaves to the stem, work a pistil stitch, starting at the stem, with the knot end stitched at the base of the leaf.
Bullion Roses and Buds: Both the roses and the buds are stitched using one strand of amethyst light, threaded in the No 1 milliner's (straw) needle. The rose is stitched with two seven-wrap bullion stitches that form the centre of the rose. The first round consists of four 10-wrap bullion stitches. The final round is then worked with two 12-wrap bullion stitches. The buds are stitched with the same needle, using one seven-wrap bullion stitch to form the centre, then two 10-wrap bullion stitches are worked either side of the centre stitch.
Leaves: At the base of the buds, using two strands of 564 in the No 7 crewel needle, work a fly stitch and then stitch lazy daisy stitches for the leaves as indicated on the pattern sheet.
Forget-me-nots: With one strand of very light cornflower (461) threaded in the No 22 chenille needle, stitch five colonial knots. Then stitch a French knot in the centre of the forget-me-not with one strand of very light heraldic gold (841), threaded in the same needle.

FINISHING
Lining the blanket: Wash the piping cord and the satin bias binding to prevent shrinkage. The satin piping is made by ironing the satin bias binding open and folding it around the piping cord so that the cord is in the centre of the bias binding. Using the zipper foot on your sewing machine, and stitching very close to the piping cord, stitch the piping cord into the satin bias binding.
Pin the satin piping to the right side of the blanket 7.5cm (3in) from the edge of the blanket, with the raw edges of the satin piping facing towards the edge of the blanket. This will be covered with the lining fabric. Still using your zipper foot, stitch the satin piping to the blanket.
Having washed and ironed the lining fabric, lay the blanket onto the centre of the lining fabric, folding the edges of the lining fabric to the right side of the blanket so that it meets the satin piping. Mitre the corners, then hand-stitch the lining to the satin piping.

Sunday, January 23, 2011

Celtic Pin Stool

This richly-coloured pin stool, designed and stitched in the true Irish tradition of Celtic work.

MATERIALS
• 30cm (12in) square of "Echo" fabric (or another suitable fabric) for the pin stool
• 25cm (Win) diameter circle of calico
• DMC Stranded Embroidery Cotton: one skein each of very dark blue violet (333), dark Christmas red (498)
• Gumnut "Buds" silk thread: One skein each of burgundy (179), purple (299), blue (369), green (629)
• Papillon thread: one reel of silver
• No 9 crewel needle
• 35cm (14in) of silver braid 6mm (1/4in) wide
• Mill Hill petite glass beads (42012)
• Mill Hill glass seed beads No (02007)
• No 7 milliner's (straw) needle
• Beading needle
• One tube of "Rub'n Buff" silver leaf paint
• Fibre filling: small amount to fill top of stool
• Decorative wooden stool: 11.5cm (4 1/2in) in diameter
• 2B pencil
• Screwdriver

DESIGN SIZE
11.5cm (4 1/2in) diameter

STITCHES USED
Bullion stitch, buttonhole stitch, lazy daisy stitch, raised stem stitch, satin stitch, stem stitch, straight stitch

Our Home amongst the Trees

Peg Fraser has assembled some of her favourite motifs into a miniature sampler. Stitch the inscription shown here or use the alphabet provided to add your own personal touch.

MATERIALS
• 30cm x 20cm (12in x 8in) 32-count "antique" linen
• Gumnut silk "Stars": 1 skein each of dark green 628 (501), light green 626 (503), gold 746 (676), blue 369 (930), red 829 (356), pink 857 (3712), brown 708 (420), (DMC Stranded Cotton substitutes are also given but these will result in a slightly different effect)
• No 24 tapestry needle

DESIGN SIZE
19cm x 8.5 cm (7 1/2in x 3 3/8in)

STITCHES USED
Cross stitch

Dragonflies in my Garden

These simple wool-embroidered pincushions, are a perfect project for both beginner and experienced stitchers. They feature dragonflies in enchanting daisy gardens.

MATERIALS
• 40cm (16in) square of cream chenille wool blanketing
• 1m (1 1/4yd) cream lace 4.5cm (1 5/8in) wide
• Appleton's Crewel Wool: one skein each of mauve (101) and purple (454)
• Gumnuts Tulips Mohair: one skein of green (643)
• Rajmahal Art Silk: one skein each of mango cream(141), pastel grey (221), Gothic grey (226)
• No 20 chenille needle
• No 7 crewel needle
• Machine-sewing cotton: one reel of cream
• Two dragonfly charms
• 2B lead pencil or a water-soluble marking pen
• Thick black texta
• Tulle for transferring of the pattern
• Polyester filling
• Greaseproof paper

DESIGN SIZE
Square pincushion: 17cm (6 3/4in) square Round pincushion without lace: 15cm (6in) diameter

STITCHES USED
Colonial knot, feather stitch, fly stitch, lazy daisy stitch, straight stitch

Morning Glory

MATERIALS
• 40cm x 112cm (16in x 44in) cream dupion silk or Thai silk
• 40cm x 112cm (16in x 44in) dress-weight batiste or fine lawn for lining the hack of the embroidery
• DMC Stranded Embroidery Cotton: 1 skein each of medium blue violet (340), avocado green (469), dark pine green (3362), very light antique mauve (3743)
• DMC Broder Medici Crewel Wool: 1 skein each of 8027, 8332, 8333, 8405, 8412, 8413, 8414, 8417
• Anchor Stranded Cotton: 1 skein each of mauve (118), pink (1021)
• No 24 and 18-22 chenille needles
• No 5-10 milliner's (straw) needles
• Machine-sewing cotton: 1 reel of ecru for tacking
• 2B pencil
• 60cm (24in) tapestry frame or 25cm (Win) embroidery hoop
• Tracing paper
• Fine black felt pen

DESIGN SIZE
13.5cm (5 1/8in) diameter

STITCHES USED
Couching, buttonhole stitch, French knot, long and short stitch, outline stitch, rope stitch, satin stitch, split backstitch, straight stitch

Friday, January 21, 2011

Lavender Hedge

MATERIALS
• Zweigart 32-count Belfast linen: 30cm (12in) square of white
• 50cm (1/2 yd) off-white fabric for the outside and the lining of the bag.
• DMC Stranded Embroidery Cottons: one skein each of dark drab brown (611), very light antique mauve (778)
• DMC Rayon Cotton: one skein of baby pink (30818)
• YLI 4mm (l/8 in) silk ribbon: 2m (2 1/4yd) each of dark green (21), 5m (5 1/2yd) medium green (20), 2m (2 1/4yd) light blue (98), 3m (3 1/4yd) light lavender (101), 5m (5 1/2yd) dark lavender (102), 2m (2 1/4yd) brown (36), 2m (2 1/4yd) white (1)
• No 3 milliner's (straw) needle
• No 22 chenille needle
• No 24 tapestry needle
• 1.5m (1 5/8yd) white cord
• 30cm (12in) tapestry frame (optional)
• Machine-sewing cotton: one reel of white
• 2B pencil

Note: This design is stitched freehand, therefore there are no measurements to follow. There is sufficient fabric and you will use the colour picture as a guide for your stitching.

STITCHES USED
Backstitch, fishbone stitch, French knot, half cross stitch, seed stitch, stem stitch, straight stitch

PREPARATION
Hint: It is a good idea to overlock or zigzag the raw edges of the linen to prevent them from fraying.
Tack the linen to the tape on either pole of the tapestry frame, then tighten the rollers until the fabric is taut. The frame is optional, but it helps you keep an even tension on your work when you are stitching the ribbon embroidery.


EMBROIDERY
Fence: With two strands of dark drab brown (611) in the No 24 tapestry needle and using Diagram 1 as a guide, stitch the fence posts. Start in the centre of your fabric and working over two fabric threads for one stitch. The fence posts are 17 backstitches high, and the railings are four backstitches wide. Add texture to the fence by stitching halfcross stitches randomly, using one strand of the same thread. Refer to diagram 1.


Hint: When starting your ribbon embroidery, bring the needle up through the fabric from the back of your work, leaving a 1cm (3/8in) tail. Likewise, when finishing your stitching, leave the ribbon at the back with another 1cm (3/8m) tail. When the embroidery has been finished, these tails will be trimmed. Using a machine-sewing cotton in a No 9 crewel needle, they will then be ended off with small backstitches gathered behind the stitches already stitched.


STANDARD ROSE
Leaves: With the dark green (21) in the No 22 chenille needle, randomly stitch tiny straight stitches for the leaves.


Roses: Thread six strands of very light antique mauve (778) in the No 3 milliner's (straw) needle and work a French knot for the centre. Then stitch straight stitches for the outer petals, overlapping them using three strands of the baby pink (30818) in the No 3 milliner's (straw) needle. Refer to diagram 2.


Trunk: Thread the No 22 chenille needle with a small length of the brown (36) and stitch stem stitches for the trunk, making sure they are stitched behind the fence rails.
Lavender: Using the dark green (21) threaded in the No 22 chenille needle, work clumps of straight stitches for the greenery. Then add the lavender flowers using the two shades of lavender ribbon (101) and (102), stitching an open fishbone stitch using the same needle as above. Refer to diagram 3.


Flowers along the baseline: These flowers are French knots stitched at random with the light blue (98) and white (1) threaded in the No 22 chenille needle. Work tiny seed stitches in amongst the flowers using the brown (36), also threaded in the No 22 chenille needle.


TO MAKE UP THE BAG
It is best to complete the making up of your bag using your sewing machine, as this gives a much stronger result. Cut the piece of linen 20cm x 11.5cm (8in x 4 1/2in). This includes the seam allowance.
Cut two pieces of fabric for the side strips along the embroidery, each 11.5cm x 4cm (4 1/2in x l 1/2in), and stitch them to the two short sides.
Cut one piece of fabric, 14cmx 26.5cm (5 1/2in x 10 1/2in) and join it to the top edge of the embroidery. Cut one piece of fabric, 6.5cm x 26.5cm (2 1/2in x 10 1/2in), and then join this to the base of the embroidery. This now completes the front of the bag.
Measure the front of your bag and then cut another piece of fabric for the back exactly the same size. Place the front and the back pieces right sides together. Starting from the top edge, stitch down the side 4cm (l 1/2in) and backstitch to end off. Leave 1cm (3/8in), and then stitch down the rest of the side seam to the base of the bag. Repeat on the other side. You now have the main part of your bag joined together. Measure the circumference and the length of the bag and cut another piece of fabric the same size, remembering to add seam allowances. Join the side seam, then place the lining and the main part of the bag right sides together and stitch around the top edge. Open the fabric out to make one long piece and press the seam allowance to the lining. Put a row of stay stitching just inside the top seam, stitching through the seam allowance underneath. Fold the bag with the wrong sides together and press along the top seam.
To make the base of the bag, cut two circles of fabric each 16.5cm (6 1/2in) in diameter, and press these with the wrong sides together. Mark the circles in quarters with pins or a coloured thread. Turn the bag right side out and also mark it into quarters. Pin the base to the main section, matching up the quarter-way marks. You may have to ease the base to fit the bag. Stitch all layers together and then overlock or zigzag the edges to neaten them.
Casing: Measure 3cm (1 1/4in) down from the top edge of the bag and stitch a row of stitches through all layers of fabric. Measure down 1cm (3/8in) from the stitched line and stitch another line of stitching below the first row.
Cut the cord into two pieces and then thread them through either side, tying a knot 2.5cm (1in) from the ends.
You now have a small carry bag to suit a number of purposes.

Wednesday, January 19, 2011

Scattered Daisies


MATERIALS
• 30cm (12in) square of embroidery linen
• 25cm (1/4 yd) fabric for the back of the cushion
• DMC Stranded Embroidery Cotton: one skein each of deep rose (309), light burnished gold (3822), two skeins each of hunter green (3346), blanc (white)
• No 6 crewel needle
• No 7 milliner's (straw) needle
• 1.25m (1 3/8 yd) piping cord for the edge of the cushion • 30cm (12in) cushion insert
• 20cm (8in) zipper
• 20cm (8in) embroidery hoop
• Water-erasable marking pen
• Spray bottle

DESIGN SIZE
23cm (9in) square

STITCHES USED
French knot, lazy daisy stitch (detached chain), stem stitch, straight stitch

PREPARATION
Trace the pattern from the pattern sheet onto your fabric with the water-erasable marking pen using your favourite light source. This can be a light box, a glass-topped table with a lamp lit up from underneath, or tape the pattern to a sunlit window. Tape the embroidery fabric over the top of the light source and trace the pattern onto the fabric.

EMBROIDERY
The embroidery for the stems and the petals is stitched with the No 6 crewel needle, and the French knots in the centre of the flowers are stitched with the No 7 milliner's (straw) needle.
Stems: Using six strands of hunter green (3346) the stems are stitched with a stem stitch. Refer to photograph 1.

Daisies: Using lazy daisy stitch and three strands of blanc (white), the petals are stitched close together, bringing the needle up from the back onto the inner circle to start the stitch. The tips of the daisies are then stitched with tiny straight stitches over the tip of the lazy daisy stitch using four strands of deep rose (309). Refer to photograph 2.

The half daisies are worked the same way.
Calyx: Straight stitches, with six strands of the hunter green (3346) following the shape across the calyx, are stitched at the base of the half daisies.
Centres: Using two strands of light burnished gold (3822), the centres of the daisies are stitched with clusters of French knots.

FINISHING
To remove the water-erasable pen markings, spray your embroidery with cold water from a spray bottle and allow it to dry.
Hint: Do not put your embroidery in the sun to dry as the water-erasable pen markings could return. Press your work with an iron after ensuring the water-erasable pen has been removed.

To make up your cushion, cut one piece of fabric for the back 33cm x 30cm (13in x 12in), and another piece 33cm x 11.5cm (13in x 4 1/2in) and join them together with the zipper. Open the zipper 10cm (4in). The back of your cushion is a little larger than needed to make it easier to stitch to the front of the cushion.
Place the back of the cushion right sides to the front of the cushion top and pin them together. Stitch the two layers together leaving an opening of 25mm at the base of the cushion. It is advisable to do this step on the sewing machine to achieve a much stronger result. Trim the raw edges and overlock or zigzag the edges to neaten them. Turn the cushion right side out.
Starting at the opening at the base of the cushion, put one end of the piping through the opening and stitch firmly in place. Pin the remaining piping cord around the cushion edge, stitching it in place as you go. Once you have reached the start of the piping cord put the end through the opening and finish stitching it neatly and firmly in place.
Place the cushion insert inside the cushion cover and your project is complete and ready to use.

Saturday, January 8, 2011

Quick Project - Note Card


Make a very special note card as a handwritten announcement of special thank you. Even though we created this one with a now baby in mind, they are suitable for any occasion — graduation, birthday, wedding, anniversary, or holiday greeting. Choose your favourite flowers and go for it!


Supplies
Blank note cards available at art supply or craft stores
13mm edge-dyed ribbon: pink, blue, purple
7mm ribbon: pale green
4mm ribbon: pale green
1 yellow bead